Virtual Instances
Before We Begin...
See the Installation Section to make sure Dex is properly installed in your Roblox project.
UI Components
At its heart, Dex is a language for writing Components. Components are portions of code responsible for specific portions of UI, and building large-scale user interfaces with Dex requires breaking your UI down into these small building blocks.
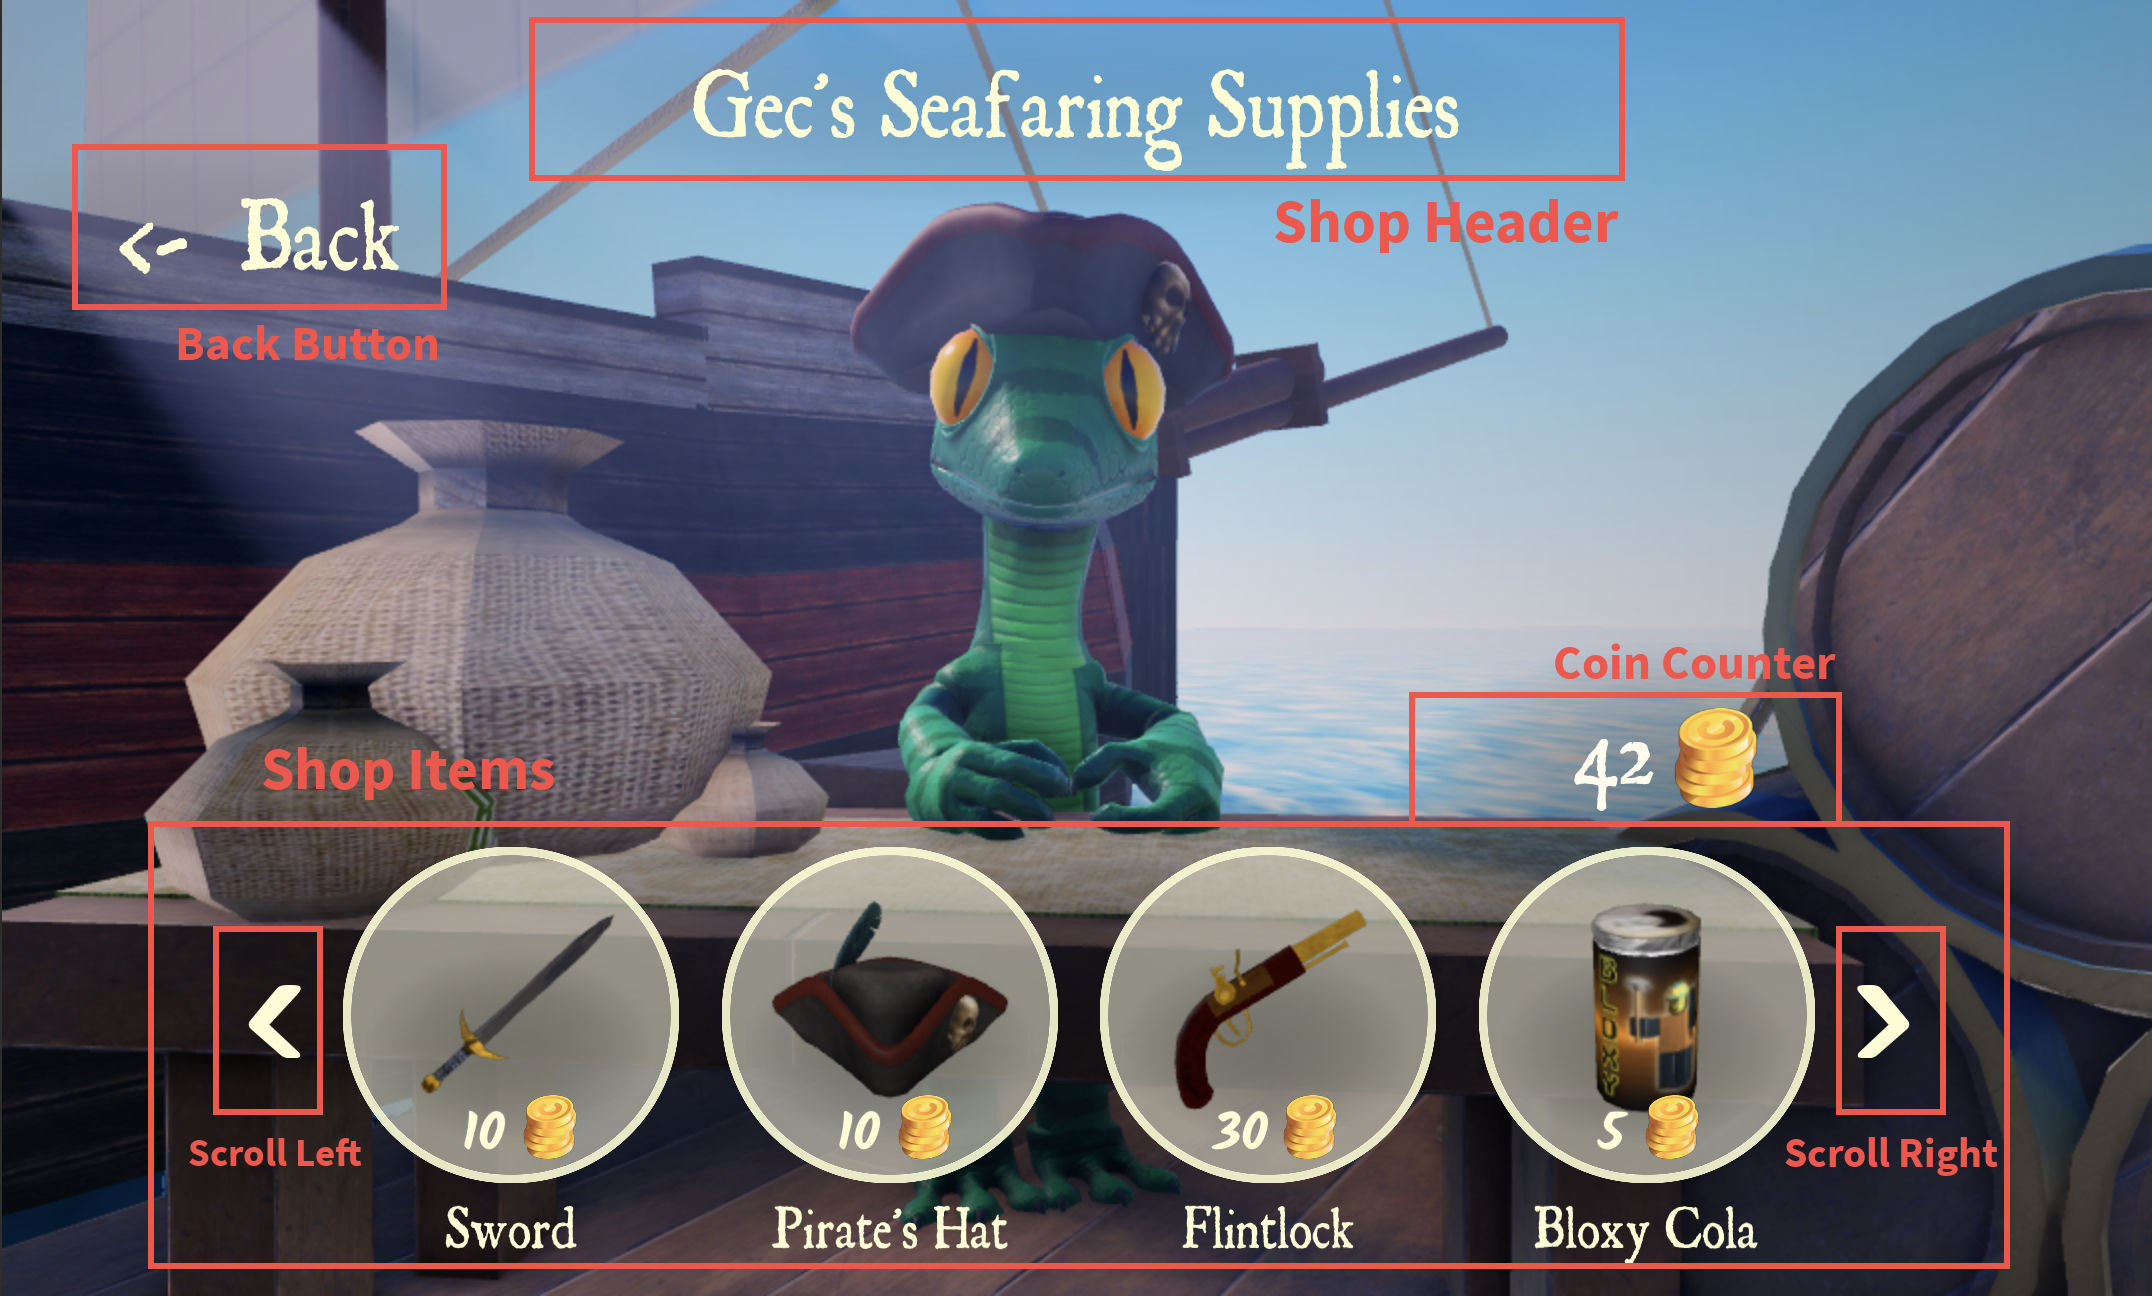
To illustrate this, imagine a Roblox game displays a shop menu to the player upon speaking to an NPC. The menu that pops up might look something like this:
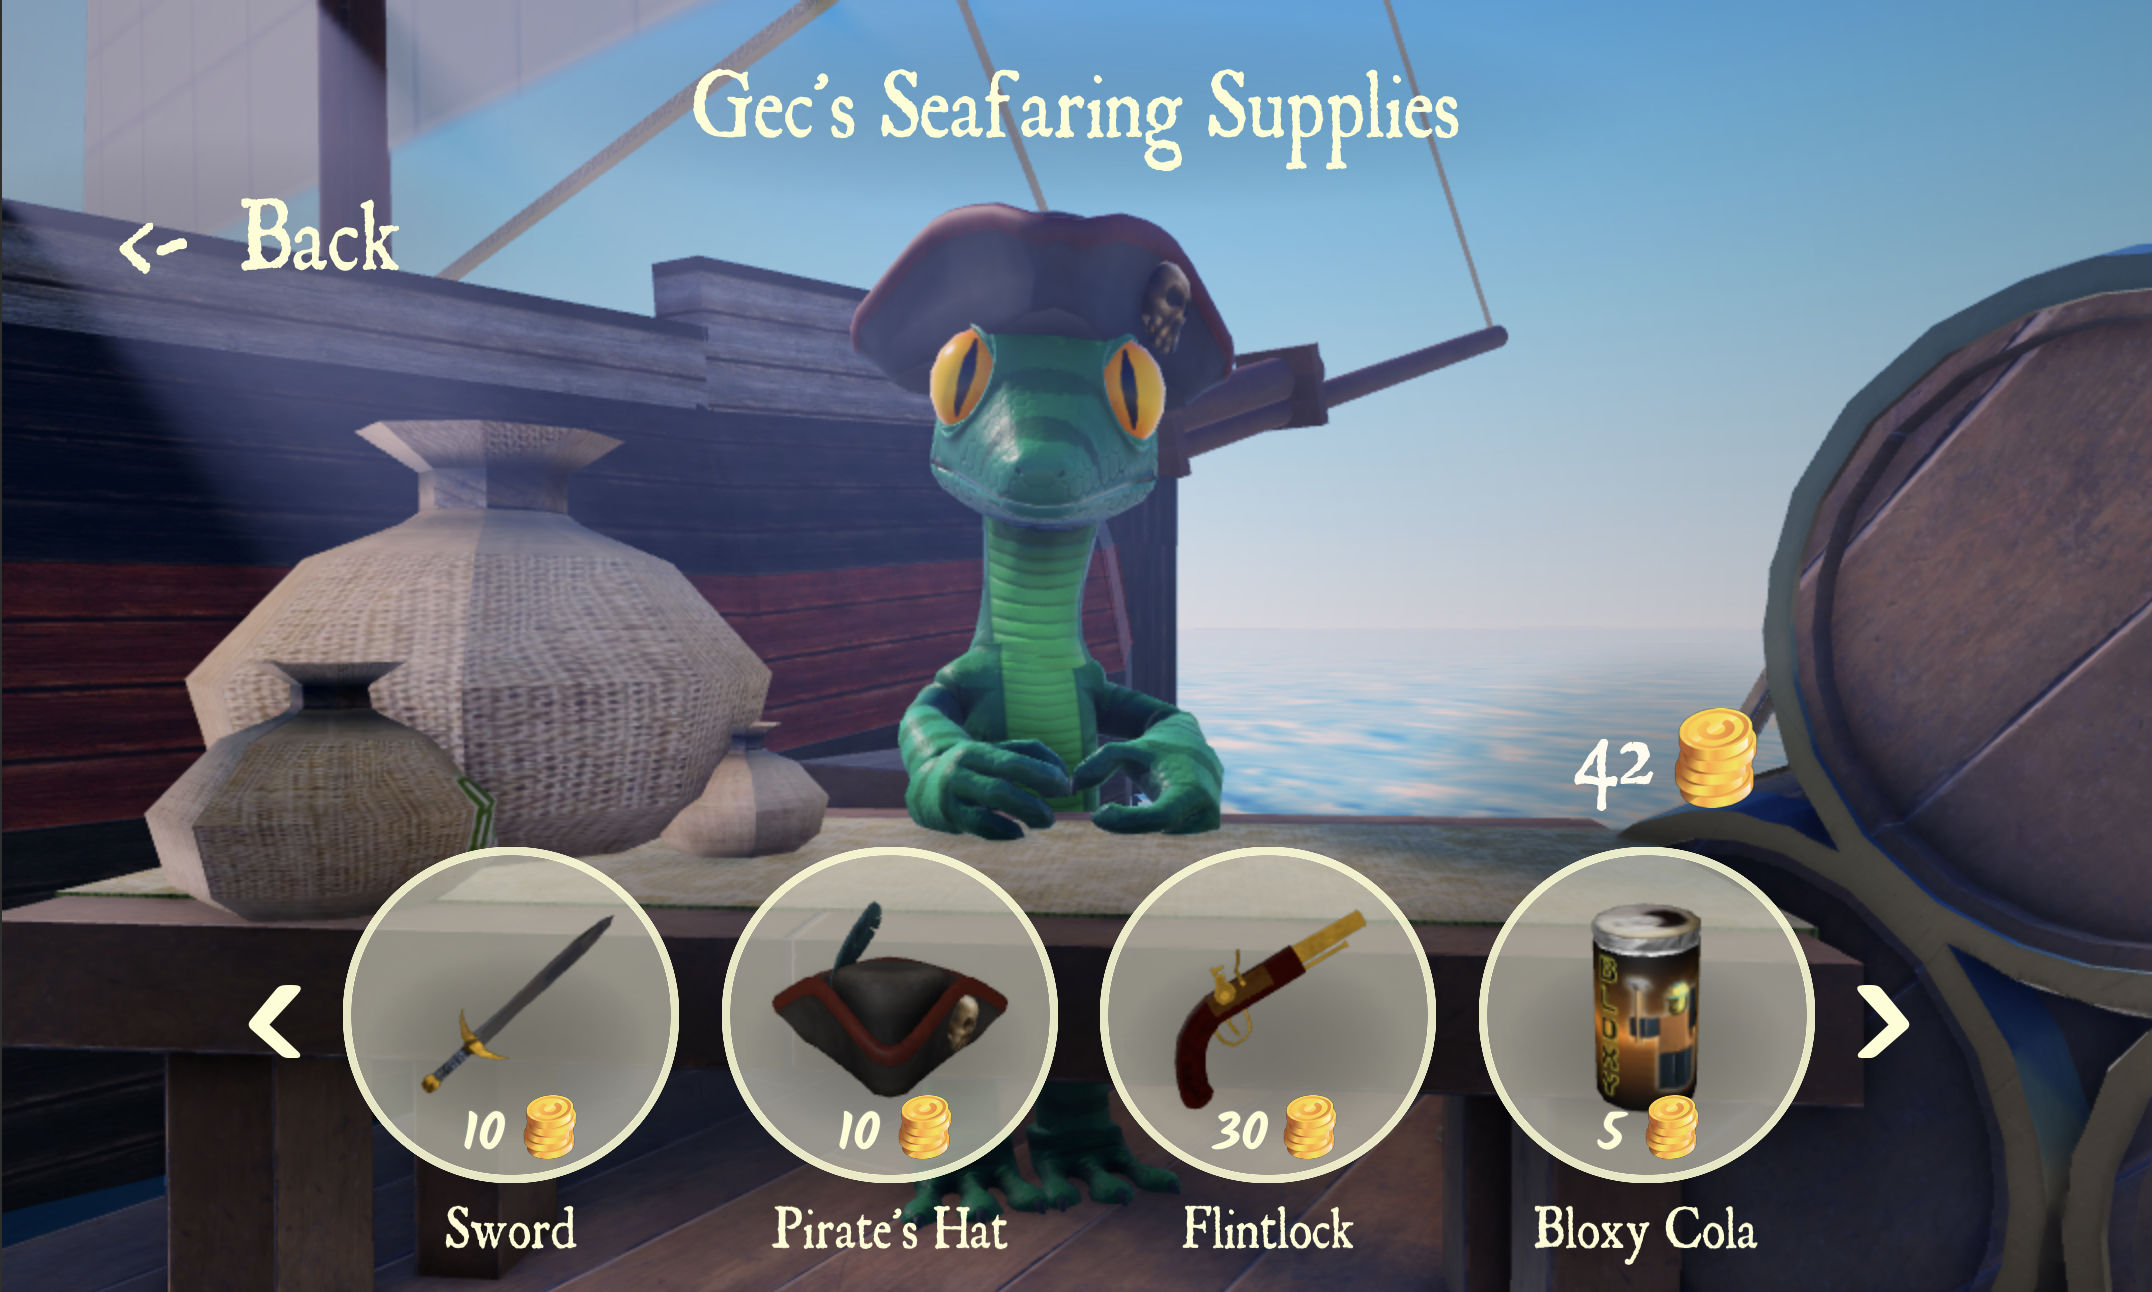
This menu contains multiple different visual elements, which can be grouped together based on location and shared function:
In Dex, Components are functions, named in PascalCase, which take in some
input parameters, and output a description of how a specific piece of UI is put
together.
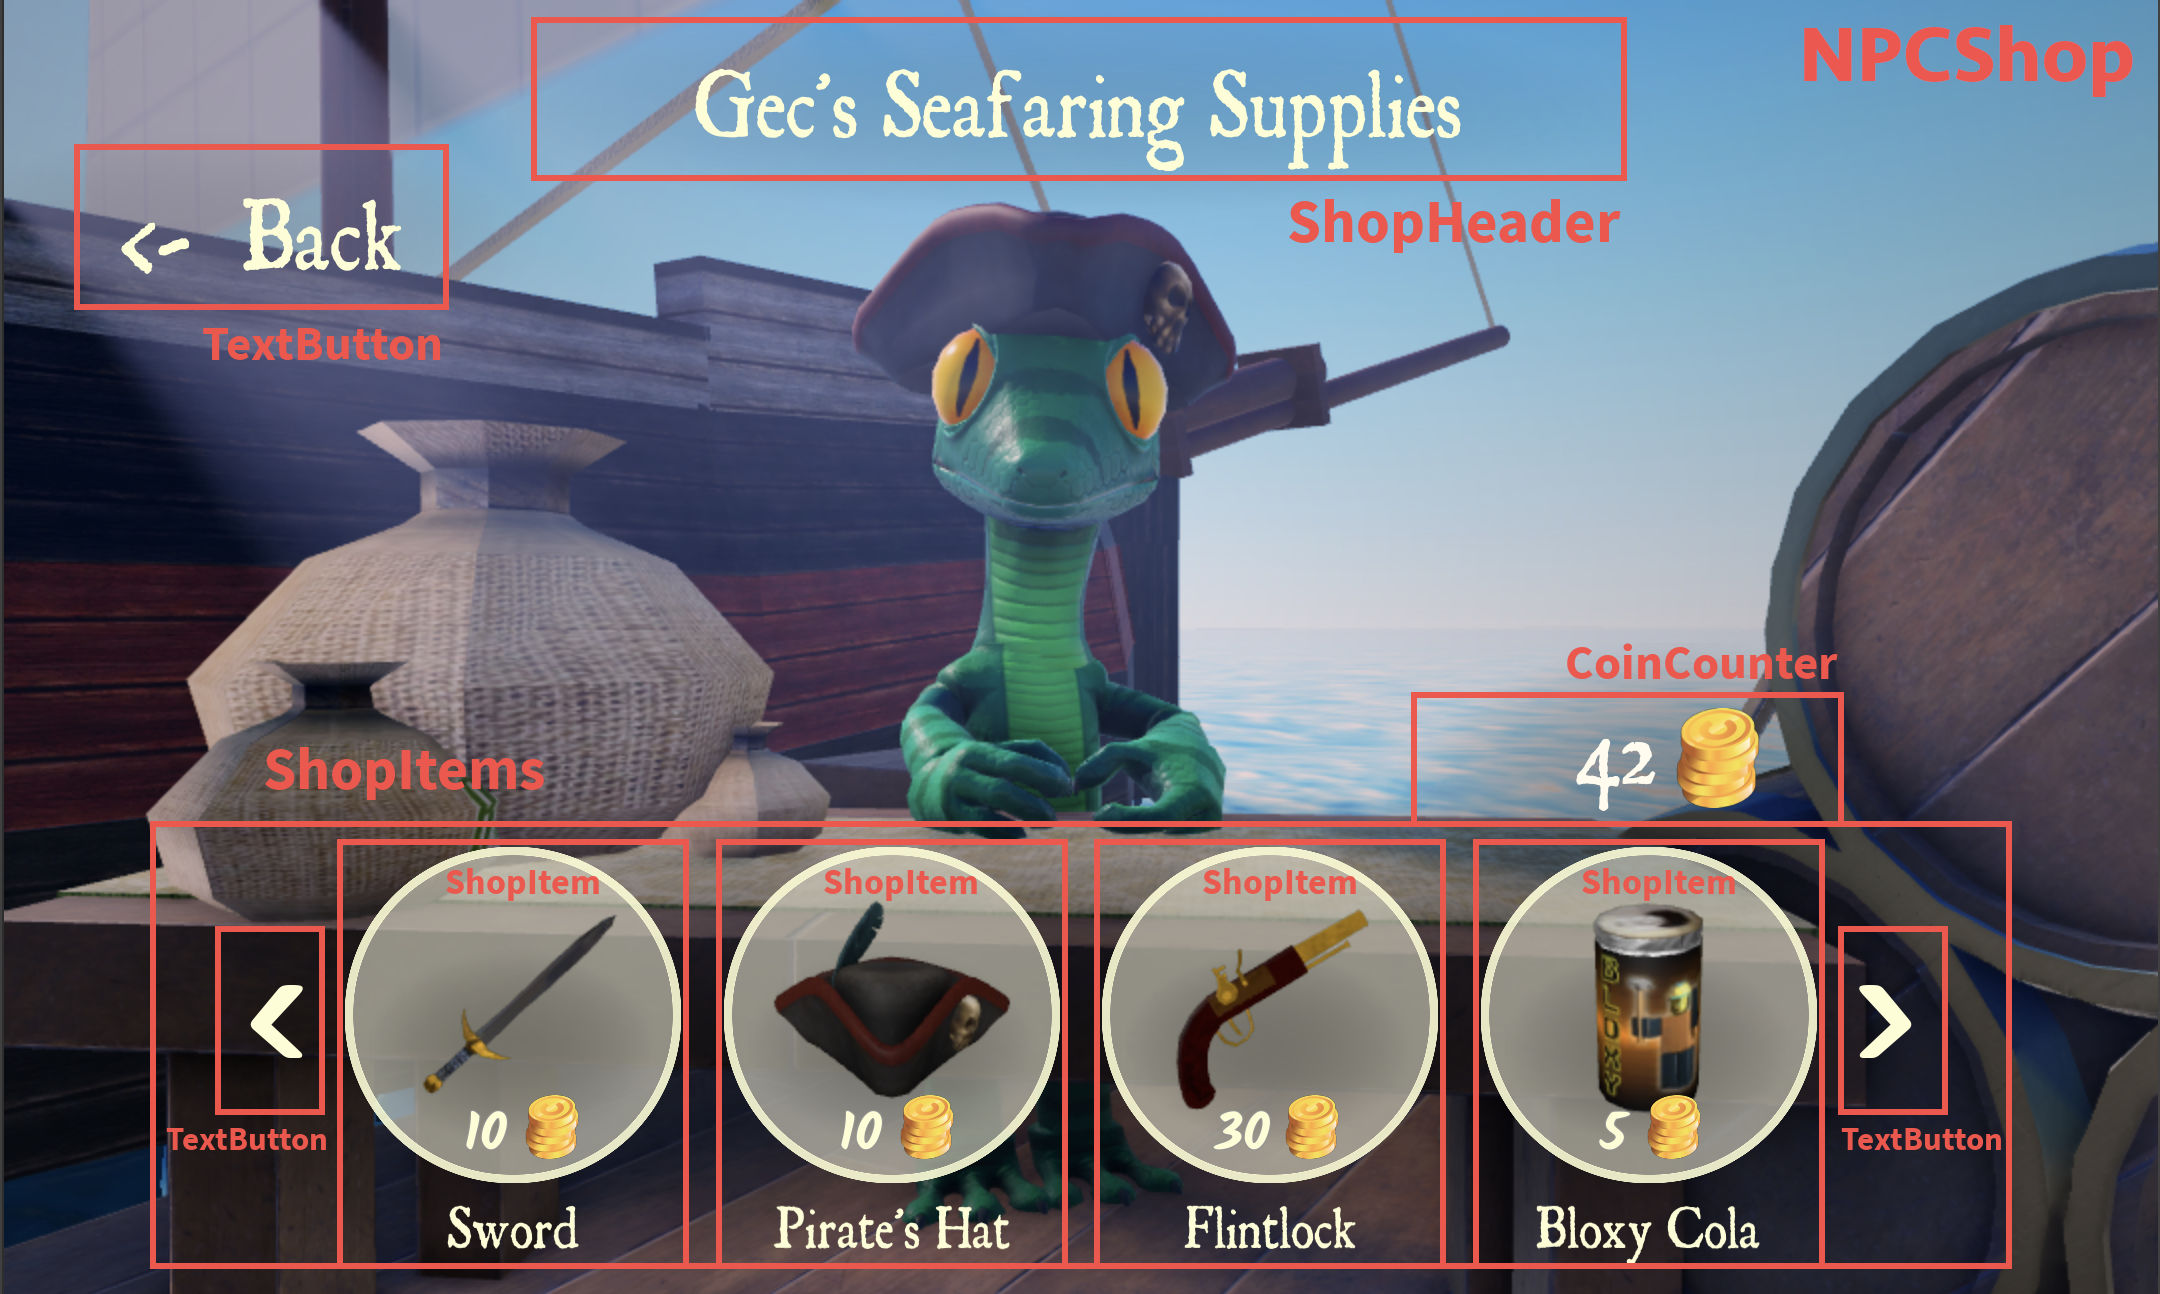
In the example of an NPC shop menu, the whole menu can be represented as 6 Dex Components:
ShopHeader- Shows the current display name for the NPC's shopCoinCounter- Displays many coins the user currently hasTextButton- Displays certain text, darkens in color when hovered/pressed, and performs some action when clicked on.ShopItems- Manages which shop items are appearing to the user at a time, and decides what happens when the left/right buttons are pressed.ShopItem- Displays info about a single ingame item—its cost, a thumbnail, and a display name—and performs some action when the circle is clicked on.NPCShop- A top-level component which contains all of the above components, and describes how they are all laid out together.
CoinCounter Component
Let's write the CoinCounter component defined in the example above. In
Dex, instances are not directly created using Instance.new; instead, Dex
components use Virtual Instances to describe how a UI component is pieced
together and interacted with, which Dex then uses to create, destroy, and modify
real instances exactly when needed.
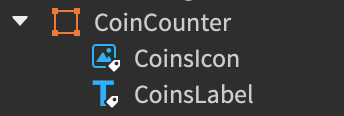
To describe the CoinsCounter component, we need at least two Instances: a
TextLabel and an ImageLabel. We will represent these as
Virtual Instances using the function Dex.New, which
takes in a ClassName and a property table as arguments.
local coinsLabel = Dex.New("TextLabel", {
    Text = "42",
    TextScaled = true,
    TextColor3 = Color3.fromRGB(255, 252, 238),
    Font = Enum.Font.Antique,
    TextXAlignment = Enum.TextXAlignment.Right,
    BackgroundTransparency = 1,
    Size = UDim2.fromScale(0.675, 1),
})
local coinsIcon = Dex.New("ImageLabel", {
    Image = "rbxassetid://14319400598",
    BackgroundTransparency = 1,
    Size = UDim2.fromScale(0.8, 0.8),
    SizeConstraint = Enum.SizeConstraint.RelativeYY,
    Position = UDim2.fromScale(0.7, 1),
    AnchorPoint = Vector2.new(0, 1),
})
To embed the image and text labels within a frame, we can pass a third
children argument to Dex.New, which is a table where the keys are the name
of the child, and the values are the virtual instance to embed under the parent:
local coinCounter = Dex.New("Frame", {
    Size = UDim2.fromScale(0.3, 0.4),
    Position = UDim2.fromScale(1, 0.5),
    AnchorPoint = Vector2.new(1, 0.5),
    BackgroundTransparency = 1,
}, {
    CoinsLabel = coinsLabel,
    CoinsIcon = coinsCounter,
})
So far, this translates to the following instance tree:
In order to make this a proper Dex Component, we should create a
function named CoinCounter which returns this virtual instance tree.
And finally, in order to playtest our CoinCounter component, we will need to
create a Root object, which translates the virtual instances into
real instances:
local function CoinCounter()
    return Dex.New("Frame", {
        Size = UDim2.fromScale(0.3, 0.4),
        Position = UDim2.fromScale(1, 0.5),
        AnchorPoint = Vector2.new(1, 0.5),
        BackgroundTransparency = 1,
    }, {
        CoinsLabel = Dex.New("TextLabel", {
            Text = "42",
            TextScaled = true,
            TextColor3 = Color3.fromRGB(255, 252, 238),
            Font = Enum.Font.Antique,
            TextXAlignment = Enum.TextXAlignment.Right,
            BackgroundTransparency = 1,
            Size = UDim2.fromScale(0.675, 1),
        }),
        CoinsIcon = Dex.New("ImageLabel", {
            Image = "rbxassetid://14319400598",
            BackgroundTransparency = 1,
            Size = UDim2.fromScale(0.8, 0.8),
            SizeConstraint = Enum.SizeConstraint.RelativeYY,
            Position = UDim2.fromScale(0.7, 1),
            AnchorPoint = Vector2.new(0, 1),
        }),
        -- Make the component look consistent on different screens
        AspectRatio = Dex.New("UIAspectRatioConstraint", {
            AspectRatio = 4,
        })
    })
end

-- Here, we define a top-level component which holds our CoinCounter
local function Gui()
    return Dex.New("ScreenGui", {
        ResetOnSpawn = false,
    }, {
        CoinCounter = CoinCounter(),
    })
end

-- root:Render() tells Dex to convert out VirtualInstances into real instances
local root = Dex.Root(game.Players.LocalPlayer:WaitForChild("PlayerGui"))
root:Render(Gui())
When playtesting with the above code in a LocalScript, the coins component will render with a static "42" being displayed.

The next section will go over how we can reactively update the UI to match the actual value of a player's coins. For now, let's go over one way we can significantly simplify this code: By using a premade template
Using Premade templates
Going back to the CoinCounter component, there's a lot of information being defined in code that is already easy to just create in Roblox Studio's UI editor. Dex is a versatile library, in that you can define as much or as little information in the code itself as you need.
We've seen VirtualInstances be created with Dex.New, but Dex actually has
three distinct types of VirtualInstances: New, Clone, and Premade.
-
NewVirtual Instances are created by the Dex library itself, as seen in the previous example. -
CloneVirtual Instances are also created by Dex, but are created created by copying an existing template, passed in as the first argument toDex.Clone() -
PremadeVirtual Instances, on the other hand, are only modified by Dex, without creating or destroying any additional instance.
Going back to the CoinCounter component, we can greatly simplify the code by
represent our component as a tree of Premade Virtual Instances, using this
downloadable template:
This can be placed directly in StarterGui and used by Dex:
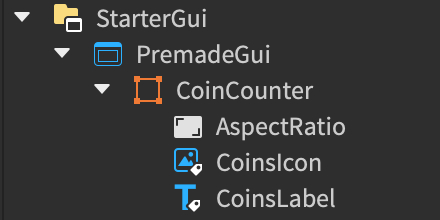
Once the template is in place, the CoinCounter component's code can be greatly
simplified to only modify the text of the CoinsLabel object, since that is the
only part of this component which actually needs to change as the player plays
the game:
local function CoinCounter()
    return Dex.Premade("Frame", {}, {
        CoinsLabel = Dex.Premade("TextLabel", {
            Text = "42",
        })
    })
end

local function Gui()
    return Dex.Premade("ScreenGui", {}, {
        CoinCounter = CoinCounter(),
    })
end

local root = Dex.Root(game.Players.LocalPlayer
	:WaitForChild("PlayerGui"):WaitForChild("PremadeGui"))
root:Render(Gui())
Upon playtesting, everything will look exactly the same as it did vefore, only that our code has shrunk in size significantly. To make changes to this UI, we can simply modify the template; the code will still update the CoinsLabel's text to "42" as it did before.
Right now this UI displays the number "42", but doesn't change at currently. The next section will show how we can use States to create a UI that updates reactively when things happen in the game world (like picking up a coin, or performing a transaction).
Coin icon created by Freepik - Flaticon.
Assets provided for download in this article are provided for educational purposes only. License is not extended by the maintainers of Dex to use the provided coin icon in any project, and is subject to FlatIcon's original license agreement